Showing posts with label Breakfast. Show all posts

Thursday, April 11, 2013

Welsh Rarebit

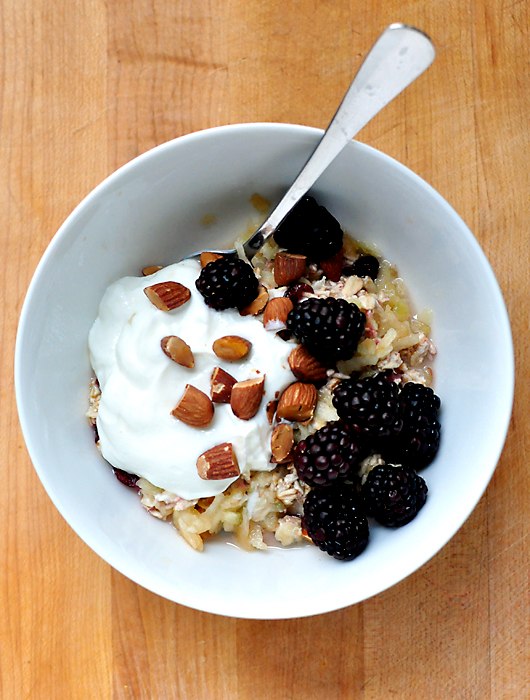
I'm starting to notice a theme emerging in the food I have been shooting and sharing with you recently: breakfast, better yet weekend breakfast recipes. Perhaps that should come as no surprise – I know very few people in the world who do not enjoy a leisurely breakfast on a weekend morning. But even more than usual, I have found myself yearning for these dishes on the weekend. All week I crave the simplicity, the slower pace, even if just for one meal.

Welsh Rarebit is a fairly new recipe in my repertoire, but with crusty bread, cheese, eggs, and beer, I am sure it is one that is here to stay. This is a hearty meal that will keep your hunger at bay for most of the remainder of your day and I bet, like me, you will find yourself daydreaming of the dish – and the weekend – soon after the next workday begins.

WELSH RAREBIT
Serves 2 to 4
Adapted from Talking With My Mouth Full by Gail Simmons

This is a hearty breakfast, perfect for a lazy weekend morning. Use a hearty bread that will stand up to, but not overpower the dish: rye, pumpernickel, or country are all good options. I also make this dish when I have leftover Homemade Everything Bagels, which adds a delicious crunch.

2 tablespoons unsalted butter, divided
1 tablespoon all-purpose flour
1 1/2 teaspoons mustard powder
1/4 teaspoon cayenne
1/2 cup Guinness (I like to use the Foreign Stout)
1 tablespoon Worcetershire sauce
4 ounces extra-sharp cheddar cheese, coarsely grated
4 pieces toasted bread, sliced about 1/2-inch thick
4 large eggs
Coarse salt
Freshly ground black pepper
Pickles, for serving

Place rack in the middle of the oven and preheat broiler.

Melt 1 tablespoon butter in a small saucepan over medium heat, then stir in flour with a rubber spatula. Cook, stirring often to ensure no lumps form, until mixture is golden brown and very fragrant, about 3 to 5 minutes. Stir in mustard powder and cayenne, followed by beer and Worcestershire sauce.

When mixture is well combined, turn heat to low and whisk in cheese until very smooth. Spread a thick layer of the mixture on toasted bread slices. Place on a sheet tray under the broiler, until cheese is bubbly and edges of toast are crisp and golden, about 4 minutes.

Meanwhile, melt remaining 1 tablespoon butter in a medium skillet over medium heat. When butter begins to foam, reduce heat to medium-low, crack eggs into butter, and fry until whites are set and yolks are still runny.

Place one egg on top of each slice of bread and season to taste with salt and pepper. Serve immediately with pickles. Leftover cheese mixture may be refrigerated up to 1 day.

Thursday, March 7, 2013

Homemade Everything Bagels


I remember the first time I realized you could actually make bagels at home. I was in pastry school, near the beginning of our bread module, and I felt silly that it had never occurred to me that this favorite New York food could be created in a home kitchen.


Even Mike seemed wary one weekend morning when, despite being exhausted from my full-time job and student schedule, I woke up and started preparing the dough. “You are going to boil these bagels, right?” he asked with a slight glare over his coffee cup. Apparently he didn’t trust a Virginia girl to be able to create a bagel worthy of a New Yorker’s approval.


But the empty sheet tray later that morning told me all I needed to know. Over the past years, I have stuck with this recipe, as it is so incredibly easy, and happily made batches upon batches for family and friends. Even living in the heart of the city, where we can walk just a few blocks to purchase bagels, I still far prefer making my own as there is no comparison for smearing a bagel, still warm from the oven, with a pad of butter and digging in. These bagels are smaller than those you might be accustom to, but I promise they are far, far more delicious.


HOMEMADE EVERYTHING BAGELS
Yields 8

Bagels are deceivingly easy to make and the extra effort is immediately rewarded by a warm-from-the-oven bagel. You can use the dough recipe and method as the base of any type of bagel you might wish to create. It is important to note that this recipe uses instant yeast, not active yeast, which can be found at most grocery stores or online. This type of yeast does not need to be bloomed in warm liquid prior to adding to the dry ingredients; instead, the yeast is mixed in with the dry ingredients and then the warm liquid is added to the entire mixture.

DOUGH
4 cups bread flour, plus more for dusting
3 tablespoons, sugar plus 1 tablespoon for poaching
3 teaspoons table salt
2½ teaspoons SAF Instant Yeast
13 ounces water, warmed to 100-110 degrees

TOPPING
Combination of poppy seeds, sesame seeds, coarse salt, dried minced garlic, and dried minced onion

Preheat oven to 425 degrees. Line a baking tray with parchment paper.

In the bowl of a stand mixer fitted with the dough hook attachment, whisk together flour, sugar, salt, and yeast. Start the mixer on a slow speed and begin to stream in the water. Increase speed to medium-high and knead until dough begins to come together.

Turn out dough on a lightly floured surface. Knead by hand until a smooth, barely tacky dough develops, adding additional flour as needed. Form into a ball, cover with the mixing bowl, and allow to rise for 10 minutes.

While the dough is rising, bring a large pot of water to a rolling boil and add 1 tablespoon sugar.

After 10 minutes, divide the dough into 8 pieces (if you are using a kitchen scale, each piece should be about 4.3 ounces). Roll each piece into a log, about 10-12 inches long. Wrap log around the palm of your hand and lightly moisten one end with a dab of water. Squeeze ends together, roll lightly on counter to secure ends, and release from hand. Repeat with the remaining dough.
Drop bagels into the boiling water, up to three at a time. Carefully run a slotted spoon under bagels to release from bottom, if necessary. When bagels rise to the top of the pot, remove and place on prepared baking sheets. Sprinkle with topping.

Bake until the bagels are well-risen and golden brown, about 20 minutes. Allow to cool for a few minutes before serving.

Thursday, February 21, 2013

Breakfast Pizza


Growing up, I loved enjoying a sweet breakfast - pancakes or waffles with syrup, chocolate chip pancakes or muffins, cinnamon buns - dishes only made better by salty bacon on the side. But as I have grown up, my tastes have evolved and I crave a certain combination of savory items for my weekend breakfast.

This pizza has all of those flavors, which is why I consider it to be the most perfect breakfast food. Eggs, salty bacon, melty cheese, shallots, chives, scallions - all on top of a deliciously flavored, crispy thin pizza crust. Good salt and pepper brighten the whole dish and make the flavors jump in your mouth. And I'm not the only one who finds this flavor combination is divine - Mike could hardly wait for me finish photographing the pizza this weekend so we could dive right in.


BREAKFAST PIZZA
Adapted from The Big Sur Bakery Cookbook
Makes 2 pizzas, serves 4 to 6 people

This pizza contains all of my favorite flavors of breakfast. Be sure to allow the pizza dough to rise in the refrigerator for two nights, the resulting flavor is incredible and worth the wait. If you have a pizza stone, be sure to use it as it will create a very crisp crust. But not to worry if you don't have a pizza stone; my oven is too small to hold one and the crust still crisps up very nicely.

Pizza Dough
1/2 teaspoon active dry yeast
1 1/2 cups plus 2 tablespoons bread flour, plus extra for dusting
1 teaspoon kosher salt

Breakfast Pizza
Cornmeal, for dusting
Bread flour, for dusting
6 bacon strips
Pizza dough (recipe above)
Olive oil, for drizzling
1/2 cup Parmesan, grated
Fresh mozzarella, sliced about 1/4-inch thick
6 large eggs
Sea salt
Freshly ground black pepper
1 shallot, thinly sliced
Chives, minced
Scallions, trimmed and thinly sliced

Make the pizza dough: Place 3/4 cup lukewarm water in the bowl of an electric mixer. Rain in the yeast, stir, and set it aside to activate for 5 minutes.

Add the flour to the beast mixture and sprinkle the salt on top. Fit the mixer with the dough hook attachment, and combine on slow speed for 1 minute, until all the ingredients start to come together. Increase the speed to medium and mix for 2 minutes. Then increase the speed to high and mix for 2 more minutes.

Immediately turn the dough out onto a lightly floured surface and divide it in half. Roll each half into a tight round. Place the balls on a floured baking sheet. Place the baking sheet in a large plastic bag and tie the bag loosely. Refrigerate overnight or up to 2 nights.

Make the pizza: The next day, about 1 hour before baking the pizzas, pull the baking sheet out of the refrigerator and leave it in a warm area until you are ready to use the dough. You do not want the dough to become too warm, as it will be difficult to shape.

Meanwhile, if you have a pizza stone, place it on the oven rack to warm. Preheat the oven to 450 degrees Fahrenheit. Generously dust the surface of a pizza peel (or baking sheet if you do not have one) with cornmeal.

Heat a large cast-iron pan over medium-high heat, add the bacon strips, and pan-fry until crisp. Put the bacon on a plate lined with paper towels, let it cool, and then crumble into bite-size pieces.

Lightly dust a work surface with bread flour. Working with one ball of pizza dough, dip your hands and your dough in the bread flour to make them less sticky, and pat the dough down into a disk shape with your fingers. Once the disk is large enough, drape the dough over your fists and carefully start stretching and expanding the dough from underneath to form a round that is 10 to 12 inches in diameter.

Place the dough on the prepared peel or baking tray. Drizzle a bit of olive oil over the dough and, using your fingers, brush the dough evenly with the oil. Sprinkle half of the Parmesan over the dough, followed by a few slices of mozzarella. Crack 3 eggs over the top and season with salt and pepper to taste.

Bake the pizza for 10 to 16 minutes, checking on it after 5 minutes and rotating it if necessary to ensure that it is baking evenly. When the crust is golden, the cheese is melted, and the egg yolks are cooked to medium. Carefully transfer the pizza to a cutting board. Let it cool for 2 minutes and sprinkle with half of the shallot and chives and scallions. Slice and serve immediately. Prepare your second pizza the same way.

Thursday, January 24, 2013

Baked Huevos Rancheros

"Hue-vos Ranch-eros" Mike slowly enunciates to me, his inflection indicating that I am expected to repeat the phrase back to him. But it rolls off my tongue in some strange combination of Spanish and French, thanks to six years spent learning to converse with Parisians. Mike rolls his eyes, smiling slightly as he grates the cheese and I return to stirring the quick, barely spicy tomato sauce that is the base of this breakfast dish.

Soon it is time to begin assembling and Mike works quickly behind me, arranging the tortilla chips (always blue in our house) in the perfect order after I have placed a bit of the sauce at the bottom of each cast iron gratin dishes.

Despite my inability to pronounce the name of the dish without a French dialect, Mike will soon be scraping the bottom of his dish to ensure he gets every bit of tomato and runny egg yolk scooped onto a crunchy chip.

--

BAKED HUEVOS RANCHEROS
Adapted from FOOD & WINE
Serves 2

I like baking this dish in individual cast-iron servers so each person has their own little meal. This makes the perfect amount of food for two hungry people at brunch, but it can easily be doubled to serve four. If it's late enough in the morning, Mike and I also like to mix up a little batch of margaritas to get the day started right!

2 tablespoons extra-virgin olive oil
1/2 small onion, finely chopped
1/4 small red bell pepper, finely diced
2 jalapeƱos, seeded and minced
1 garlic clove, minced
1/4 teaspoon dried oregano, crumbled
Salt and freshly ground pepper
One 15-ounce can diced tomatoes
1 1/2 cups tortilla chips
4 large eggs
1/2 cup shredded Monterey Jack

Preheat the oven to 400°. In a saucepan, heat the olive oil. Add the onion, bell pepper, jalapeƱos, garlic and oregano. Season with salt and pepper and cook over high heat, stirring, until lightly browned, 5 minutes. Add the diced tomatoes and simmer for 5 minutes, until slightly thickened.

Spoon the sauce into 2 individual, shallow baking dishes and arrange the tortilla chips around the sides. Crack 2 eggs into each dish and sprinkle with the cheese. Set the dishes on a baking sheet and bake for 12 to 15 minutes, until the egg whites are set and the yolks are still runny (or cook longer if you like a harder yolk). Serve right away.

Thursday, January 10, 2013

Grammie Lyford's Pancakes


Our train pulled into Penn Station just after 10 PM on New Year's Eve.  Battling the throngs of party-goers had not been anywhere in our original plan for the evening, an evening we had looked forward to spending quietly at home with friends, a thoughtful dinner, and a few bottles of bubbly.  But life had different plans for us that evening and we quietly trudged towards the 6 train, bypassing people not much younger than ourselves in sparkly, barley-there outfits.  We were exhausted and hungry.

By the time we returned to our apartment, any place we could have hoped to pick-up a quick bite was closed for the night.  Our refrigerator was stocked with food, but all for time-consuming meals I had planned to leisurely put together on my days off.  "How about pancakes?" I asked wearily.  Mike nodded his approval as he removed his tie.

Soon the sounds of butter sizzling as it hit the hot griddle filled the tired silence and the smell of pancakes quickly engulfed our apartment.  We sat across from each other with heavy eyes, comforted by the familiar taste of fluffy pancakes, smeared with softened butter and sweet maple syrup.

--

GRAMMIE LYFORD'S PANCAKES
Makes 8-10 pancakes

This is my great-great grandmother's recipe and, in my very biased opinion, it is the best pancake recipe in the world.  The recipe is a great base for any variations you might wish to try - chocolate chip and blueberry are family favorites - and you just add your additions to the batter right before cooking.  But on most weekend mornings, there is nothing more comforting than a big stack of plain pancakes with pure maple syrup.

2 eggs
1 1/2 cup whole milk
2 cups all-purpose flour
2 tablespoons sugar
4 teaspoons baking powder
1/2 teaspoon table salt
2 tablespoons butter, melted, plus more for griddle

In a large mixing bowl, whisk the eggs and the milk.  In a medium mixing bowl, sift together the flour, sugar, baking powder, and salt.  Mix the dry ingredients into the wet ingredients just until blended.  Stir in melted butter to create a smooth batter.

Warm a griddle over medium heat.  When griddle is hot, melt a bit of butter over the griddle.  Scoop batter into desired size and cook until bubbles begin to form.  Check to ensure the cooked side of the pancake is golden-brown, then flip to finish cooking on the other side.  Serve immediately.  

Monday, January 3, 2011

Homemade Muesli

DSC_0114

At the beginning of a new year, I ponder just how many people resolve to lose weight. Start exercising! Exercise more! Eat less! Eat healthier!

After college, I lost weight consumed by mug fulls of beer at the local bar and for two glorious years, I did not resolve to lose one pound. I loved running, rarely missed a day at the gym, and packed healthy meals for work each day. The pounds slipped off and stayed off.

The problem arose when I left the comfort and schedule of my office job. Suddenly, food surrounded me all the time, every cookie promising to comfort my stress and worries. Ten pounds later, the stress remained alongside the jeans I could no longer fit into.

So I imagine I joined the majority of Americans this year in vowing to readjust my diet and exercise routines. However, I must also be realistic - in my chosen career path, food will always be readily available and stress will always be plentiful. My indulgences are wine and dessert and I adamantly refuse to give these up.

Since I am already approaching shedding of these stubborn pounds with a resistant attitude, I know I am going to have to make adjustments elsewhere.


Monday, December 27, 2010

Christmas Stollen

DSC_0140

Christmas morning. Presents unwrapped and revealed, empty stockings rehung, and the decorated tree breathing a deep sigh of relief. Breakfast in my family is a secondary thought to the excitement of the morning and the turkey in the oven.

DSC_0086

But this year, the morning before Mike and I fought the tourists and traffic to escape the city for a quaint Christmas in southwestern Virginia, I kneaded the silky, spicy stollen dough between my fingers and incorporated the dried fruit smelling of fresh orange juice and comforting bourbon.


Wednesday, October 27, 2010

Nutella Bomboloni with Hazelnut Sugar

DSC_0406

The October 2010 Daring Bakers challenge was hosted by Lori of Butter Me Up.  Lori chose to challenge DBers to make doughnuts.  She used several sources for her recipes including Alton Brown, Nancy Silverton, Kate Neumann, and Epicurious.

DSC_0353DSC_0358DSC_0360DSC_0362

Personally, I have never liked doughnuts.  Crazy, right?  

But I only speak the truth.  Ask my father who was forced to purchase a blueberry muffin on weekend morning runs to Dunkin' Donuts.  If he forgot to purchase the muffin, or if they happened to have sold through their stash for the morning, I would refuse to eat breakfast.  

I was a bit stubborn as a child.


Thursday, September 2, 2010

Homemade Granola Bars

DSC_0074

I have been filing this recipe away since I saw Ina Garten create them in her amazing kitchen a few months ago.  I finally found the perfect excuse to try the recipe, packaging them as a perfect on-the-go snack for friends who are new parents to a beautiful baby boy.

I don't know from experience, but I imagine a newborn does not allow for a lingering breakfast over an endless pot of coffee in the morning.

My mother confirmed this hunch.  And I'm pretty sure she silently inserted how long she was in labor with me.

Either way, I thought two new sleep-deprived parents could use a nutritious, quick, energy-packed start to the day.

Tuesday, August 24, 2010

Sweet Corn Muffins

DSC_0653

Here in Manhattan, the Union Square Greenmarket has blessed its customers this summer with the sweetest, most tender corn imaginable.

Fresh corn is always plentiful and delicious in the summer months.  A perfect ear of corn instantly takes me back to the summer dinners I enjoyed with my family.

DSC_0590

The kernels are so incredibly juicy and sweet.  Corn has been at the base of many of my summer salads this season - quickly grilled or lightly sauteed with an equally delicious tomato.

But this year's crop has been the most succulent I can recall.  In fact, Mike has taken to eating the kernels straight from a freshly husked ear of corn.

"This...corn...is...amazing!" he exclaims, barley audible between each mouthful.

Wednesday, June 2, 2010

Mummy's Banana Bread

DSC_0231 © Dolcetto Confections | Allison M. Veinote, 2010

Growing up, we didn't have a whole lot of extra food lying around the house. This was not an indicator of deprivation in any form. Far from it.


But, with two little girls, money and time were tight. So, if the request for a certain item was not legibly written on my mother's grocery list before 9 AM Saturday morning, you were out of luck.


Every once and awhile, three bananas would magically appear on the kitchen counter. My father, sister and I would exchange silent glances to inquire whether the others had made the request for the fruit.


No, no and no. When the answer was negative all the way around, we knew what to do. Walk away and don't touch the bananas. Forget you saw them.


They, since not requested, were not for free consumption. The bright yellow fruit was to stay undisturbed, uneaten until brown flecks began to appear.


A day later, as the sugars continued to be released from within and the flecks had unified to form long bruises on the skin, they were ready.


Ready to be mashed into a beautiful loaf of banana bread.


DSC_0216 © Dolcetto Confections | Allison M. Veinote, 2010 DSC_0217


DSC_0222 © Dolcetto Confections | Allison M. Veinote, 2010


I still love the smell of banana bread baking, the aroma released during its baking is both deliciously unmistakable and wholly comforting.


DSC_0240 © Dolcetto Confections | Allison M. Veinote, 2010


To consume a fresh, warm slice from the oven is heavenly. Just add a good cup of coffee for the perfect breakfast.


Monday, May 17, 2010

Chocolate Chip Scones

DSC_0209

I slept fitfully Sunday night, never more than 20 minutes passed between my eyes shutting peacefully and being startled awake by some thought springing them back open.


As of recently, I have a lot on my mind.  I feel as though I am desperately trying to stay motivated, trying to stay positive, trying to hold all the pieces together.


It's hard work.  It's exhausting.  And I am not entirely sure I am succeeding at my efforts.


By 5:30 AM, I gave up on sleep all together.  My mind, along with my heart, would not stop racing.  So, I shuffled quietly into the living room, poured a steaming cup of coffee and sunk into the soft, leather of the couch with a new book in tow.


The world outside my window was dewy and silent.  Too early even for the cab drivers to fill the air with their endless honking.


As I sat there, clutching my knees to my chest, reading as the sun began to stream through the dark, wooden blinds, I decided a crispy, hot scone would pair quite lovely with my coffee.


And I figured if I incorporated chocolate chips, Mike might take a few extra lingering moments to enjoy a rare, hot breakfast before the beginnings of another long week.


Monday, April 19, 2010

Banana Chocolate Chip Muffins

DSC_0079 © Dolcetto Confections | Allison M. Veinote, 2010


Earlier this week, on the train home from work, I sleepily perused this month's issue of Food & Wine.  Magazine reading is just about the extent of what I have the energy to do after a long shift on my feet.


A recipe for banana chocolate chip muffins caught my eye.  Which is kind of funny, since I hate banana muffins.


I'm not quite sure why I detest banana muffins.  I love bananas and a warm slice of banana bread always reminds me of home.


However, the texture of banana muffins always reminds me of baby food - chunky and a little mealy.  Gross.


But, for some reason, I really wanted to make these muffins.  And I just so happened to have a couple overripe bananas - forgotten in the long days since their promising purchase.


To achieve more of the texture I desired, I was sure to not only mash the bananas, but I also paddled them on the mixer until they were a smooth, creamy consistency.


I also added some whole wheat flour and chopped walnuts to the mix, not only because I felt the flavors would blend nicely with the banana, but also to make them a bit healthier.


Warm swirls of steam escaped the muffin as I opened the center.  The taste was homey and comforting, smooth and tender - like no other banana muffin before.


DSC_0075 © Dolcetto Confections | Allison M. Veinote, 2010


I loved having these around this week, when I woke up in the morning and was just too tired to make anything for breakfast.  They provide a tasty, healthy start to my day - with just a bit of sweetness from the chocolate chips.


Sunday, April 4, 2010

Lemon Ginger Pound Cake

DSC_0082© Dolcetto Confections | Allison M. Veinote, 2010


For Easter this year, Mike and I joined part of his family for brunch at The Carltun on Long Island.


DSC_0073 © Dolcetto Confections | Allison M. Veinote, 2010


The day was sunny and warm, with just enough breeze to keep us cool.


DSC_0122 © Dolcetto Confections | Allison M. Veinote, 2010


I brought individual lemon ginger pound cakes as a small gift for everyone. A sunny, bright combination of flavors to welcome a new season of Spring.


I hope you all enjoyed a very happy, relaxing Easter Sunday!


Monday, March 8, 2010

Jordan Pond House Popovers

DSCN2493


When I was younger, my family returned to Maine each summer to visit family and friends during whatever two week period we could all align our schedules.  Even little girls have busy lives!


On one of the days during our vacation, we would drive to Acadia National Park, enjoy the views and the serenity followed by afternoon tea and popovers at Jordan Pond House.


This tradition was surely one of our classier ones and I always felt like Samantha from our American Girl books - sitting-up perfectly straight, surrounded by the rich and middle-class alike and sticking out my pinkie finger as I sipped my raspberry lemonade.


Even today, when I return to Maine in the summer, my only request is to visit Jordan Pond House.


As I have grown older, the raspberry lemonade has been replaced with coffee.  Although, if my sister happens to be visiting as well, I usually steal a few glorious sips of her raspberry lemonade.  And since she misses me, she lets me get away with it.  It's good being the older sister.


But my popover order has not changed in the least.  With just a smear of strawberry jam, I am in heaven, surrounded by mountains, trees, water and sunshine.  And it must be strawberry jam.  Other flavors just don't cut it.


I have resisted making popovers because I do not have a popover pan.  I don't have a popover pan because it won't fit in my tiny counter-top oven.  Whimper.


But with all the rain and gloom of last week, I needed to be transported somewhere sunny and warm, with just a slight breeze blowing through.  I needed to go there even if it was just through my breakfast plate.


I prepared the batter the night before so it had time to properly age before baking on Sunday morning.


The recipe was easy enough and it whipped up in no time.


Saturday, February 27, 2010

Test Recipe: Workout Granola

Workout GranolaThis test recipe is not one which has been sitting around in my recipe book or in a magazine on the shelf, patiently waiting it's turn to be created in my little kitchen.


Instead, it is one that I developed by myself, using some proportions from my basic granola recipe and some ingredient inspiration from a newly developed granola during my externship.


I wanted to create a granola that was packed with protein to help fuel our long days, Mike's endless studying, our Crossfit and running workouts.  I wanted something that could be consumed quickly, at a desk or on-the-go, and would pack a healthy punch.  I wanted a granola that could stave off crankiness after a long day of work, but still facing an evening of things to do.


This is actually the second test of this recipe.  The first one ended, well, terriblely.  My proportions for the liquid ingredients were a lot-a-bit off.  Ten minutes after putting the mixture in the oven, the granola was swimming in a pool of honey and olive oil.  Into the garbage and back to the drawing board.


This second attempt ended much better.


Tuesday, February 16, 2010

Test Recipe: Cranberry-Ginger Scones


Last week’s test recipe (I’m behind, I know) was one I had acquired from Williams-Sonoma after my short visit to Maine last summer.

Some of the family was together in Seal Harbor and, on a beautiful morning, we all congregated at a local coffee shop to ingest some caffeine before the rest of our day.

My little cousin Sarah recommended the place.


The place was small, but welcoming with a beautiful, handmade bar-height table and a mother-daughter duo behind the counter.

We sat around drinking coffee and tea, chatting and discussing the complexities of Blow Pops and those daggone beach chairs that little girls fall out of and scrape up their noses.


In between all this big-girl talk, I ventured over to the tiny baked goods display and selected a cranberry ginger scone.  In speaking with the lovely owner, I learned she made these each day and they always sold out.


They weren’t too sweet – she said most of the sweetness came from the crystalized ginger and there was just a bit of sugar in the actual dough.


This is why I liked this particular scone so much.  Scones seem to be either too sweet or not-sweet-enough for my liking.  I’ve tried a lot of recipes, but had yet to find one that would serve as a strong base for many combinations of fruits and flavors.


Off to the kitchen to try one more.


Sunday, January 31, 2010

Cinnamon Rolls with Cream Cheese Glaze


Saturday morning was bitterly cold here in Manhattan. The apartment was freezing, even with multiple layers, my favorite robe and fuzzy slippers.


I prepared the coffee as these cinnamon rolls were baking in the oven. The spicy smell of the cinnamon awoke Mike from sleep.


Hot out of the oven, they received a beautiful, shiny coat of cream cheese glaze.


Into the cake stand, onto the table and into our cold, empty bellies.


I might just be able to make it through another cold New York day after all.


Cinnamon Rolls with Cream Cheese Glaze

adapted from Bon Appetit (March 2008)

Download Recipe: PDF | Word


Ingredients


Dough:


  • 1 cup whole milk

  • 3 tablespoons unsalted butter

  • 3 1/2 cups unbleached all purpose flour, divided

  • 1/2 cup sugar

  • 1 large egg

  • 2 1/4 teaspoons rapid-rise yeast (or 3/4 teaspoon SAF Instant Yeast)

  • 1 teaspoon table salt

  • Nonstick vegetable oil spray


Filling:


  • 3/4 cup light brown sugar

  • 2 tablespoons ground cinnamon

  • 4 tablespoons unsalted butter, room temperature


Glaze:


  • 4 tablespoons cream cheese, room temperature

  • 4 tablespoons unsalted butter, room temperature

  • 1/2 cup powdered sugar

  • 1/4 teaspoon vanilla extract


Preparation Instructions


For dough:


Combine milk and butter in glass measuring cup. Microwave on high until butter melts and mixture is about 110 degrees, 30 to 45 seconds.


Pour into bowl of stand mixer fitted with paddle attachment. Add 1 cup flour, sugar, egg, yeast, and salt. Beat on low speed 3 minutes, stopping occasionally to scrape down sides of bowl.


Add 2 1/2 cups flour. Beat on low until flour is absorbed and dough is sticky, scraping down sides of bowl. If dough is very sticky, add more flour by tablespoonfuls until dough begins to form ball and pulls away from sides of bowl.


Turn dough out onto lightly floured work surface. Knead until smooth and elastic, adding more flour if sticky, about 8 minutes. Form into ball.


Lightly oil large bowl with nonstick spray. Transfer dough to bowl, turning to coat. Cover bowl with plastic wrap, then kitchen towel. Let dough rise in warm draft-free area until doubled in volume, about 2 hours.


For filling:

Mix brown sugar and cinnamon in medium bowl.


Punch down dough. Transfer to floured work surface. Roll out to 15 x 11-inch rectangle.


Spread butter over dough, leaving 1/2-inch border. Sprinkle cinnamon sugar evenly over butter.


Starting at 1 long side, roll dough into log, pinching gently to keep it rolled up. With seam side down, cut dough crosswise with thin sharp knife into 18 equal slices (each about 1/2 to 3/4 inch wide).


Spray two 9-inch square glass baking dishes with nonstick spray. Divide rolls between baking dishes, arranging cut side up (there will be almost no space between rolls). Cover baking dishes with plastic wrap, refrigerate overnight.


In the morning, remove rolls from refrigerator and let rise in warm draft-free area until almost doubled in volume, ninety minutes to two hours.


Preheat to 375 degrees. Bake rolls until tops are golden, about 20 minutes. Remove from oven and invert immediately onto rack. Cool 10 minutes. Turn rolls right side up.


For glaze:


Combine cream cheese, powdered sugar, butter, and vanilla in medium bowl. Using electric mixer, beat until smooth. Spread glaze on rolls. Serve warm or at room temperature.


Wednesday, January 13, 2010

Brioche Rolls


Among other kitchen related items, my sister gave me sea salt for Christmas.

I love sea salt.

I especially love sea salt on these fresh brioche rolls, just pulled from the toasty oven.

A thin (okay, okay not-so-thin) smear of Nutella is just about all that is needed here.

Thursday, December 24, 2009

Brioche

Last week in the kitchen, there was some extra brioche up for grabs. I was just about to leave, so I wrapped up a few slices to take home with me for a special treat for breakfast the following morning.

I placed two slices in the toaster, on the lowest setting so as to just warm the bread, and felt a slight twinge of guilt. I used to make a batch of bagels every weekend for Mike, which would provide a yummy, homemade breakfast throughout the week.

But life has been incredibly hectic, not unlike most of the previous year, but especially so around the holidays.

Pop! The brioche was ready. I prepared the warm slices just how I like them, with a thin smear of Nutella. I served them to Mike with his morning coffee.

And what happened? He fell in love - with the brioche and Nutella that is. He wanted to know how much brioche was left. Only two pieces. Enough to make it to the weekend.

So in between laundry, cooking, cleaning, baking, shopping and wrapping this weekend, I prepared a loaf of brioche just for Mike. A special treat for the groggy mornings ahead.

I used the recipe from school which I thought was amazing when we made it in class. I'll go ahead and ruin the ending by saying that it does not even compare to Gramercy's version.

Have you ever made brioche at home? The dough is amazingly beautiful. I do not have a dough hook, so I just used the paddle for my Kitchen Aid.

It is kind of a sticky dough when the ingredients are first combined and placed in the mixer for about twenty minutes.

Just before the dough is ready, it begins to pull away from the sides of the bowl and climb up the attachment.

When it is finished in the mixer, it is transfered to a bowl where it will begin fermentation. Just look how beautifully silky the dough is!

Now it has to double in volume, which took about two hours due to the chill in the air. It is then transferred to the refrigerator, where the fermentation is slowed and the butter becomes solid again. I let it sit in the refrigerator overnight.

The next morning I shaped the dough and placed it into a parchment-lined loaf pan. Again, it had to rise until doubled in volume. This only took about an hour since the kitchen was already warm from baking.

Once it was properly risen, I gently applied an egg wash and popped it in the oven. The baking brioche filled the apartment with the warm, comforting scents of yeast and butter.

Once the top was properly browned, it was ready to cool.

Mike ran out to pick up a few things for me at the store so I did not have to face the snow. He was rewarded with fresh-from-the-oven brioche with Nutella.
 
Site Design By Designer Blogs